Introduction
One of the open-source XMPP servers that can be used to configure EdgeVPN.io groups is Openfire. You may deploy Openfire in many different ways, such as installing on a physical host, using a Docker container, or deploying on a cloud provider. An XMPP server is necessary for the system to work - nodes in a virtual network use an XMPP server for the following purposes:
- Network membership: the XMPP server holds identities to authenticate nodes, and also groups them together to specify which nodes are allowed to join the virtual network. A single XMPP server can be used to create multiple users (individual endpoints) and groups (the set of nodes that form a network).
- Peer discovery: nodes use XMPP “presence” messages to advertise themselves to other nodes. These are short messages that are sent periodically to the XMPP server, and forwarded to nodes belonging to a group
- Signalling to create tunnels: EdgeVPN.io uses XMPP short messages to exchange information that is needed to create Internet tunnels. These include the set of candidate endpoints (IP:port of the local node, as well as STUN and TURN endpoints), and certificate fingerprints to establish a private, encrypted tunnel
This document explains steps to configure an Openfire XMPP server for use with the software. As far as configuring an XMPP server, the main configuration steps boil down to the creation of users and groups, and the configuration of passwords or x509 certificates, depending on which authentication method you use.
A password-based authentication scheme is simpler, but less secure and manageable. Note: there are many different ways to configure an x509-based authentication infrastructure - the instructions below serve as a template and starting point, but you will need to adjust based on your own setup.
Creating users and groups
Openfire exposes a Web-based admin interface to configure users and groups. The suggested configuration for a network is as follows:
- Create a user for each node that joins a network. User names can be made unique by convention - for instance, evpn_XX_user_YY, where XX identifies a group, and YY identifies a node
- Create a group for each virtual network, and add users to this group - for instance, a group evpn_XX that has all users evpn_XX_user_YY added to it
Once you authenticate to the Openfire admin interface, creating users and groups in Openfire is fairly straightforward - please refer to steps 3 and 4 of this document for instructions
Setting up certificates
This step is not necessary if you use password-based authentication; they provide a template for you to follow if you plan to use x509-based authentication.
Certificate Authority
You will need a Certificate Authority (CA) in order to issue certificates for your setup. There are many different ways and several documents you can find on how to configure a CA, depending on your use case. For instance, you may configure a simple CA using openssl tools in Linux:
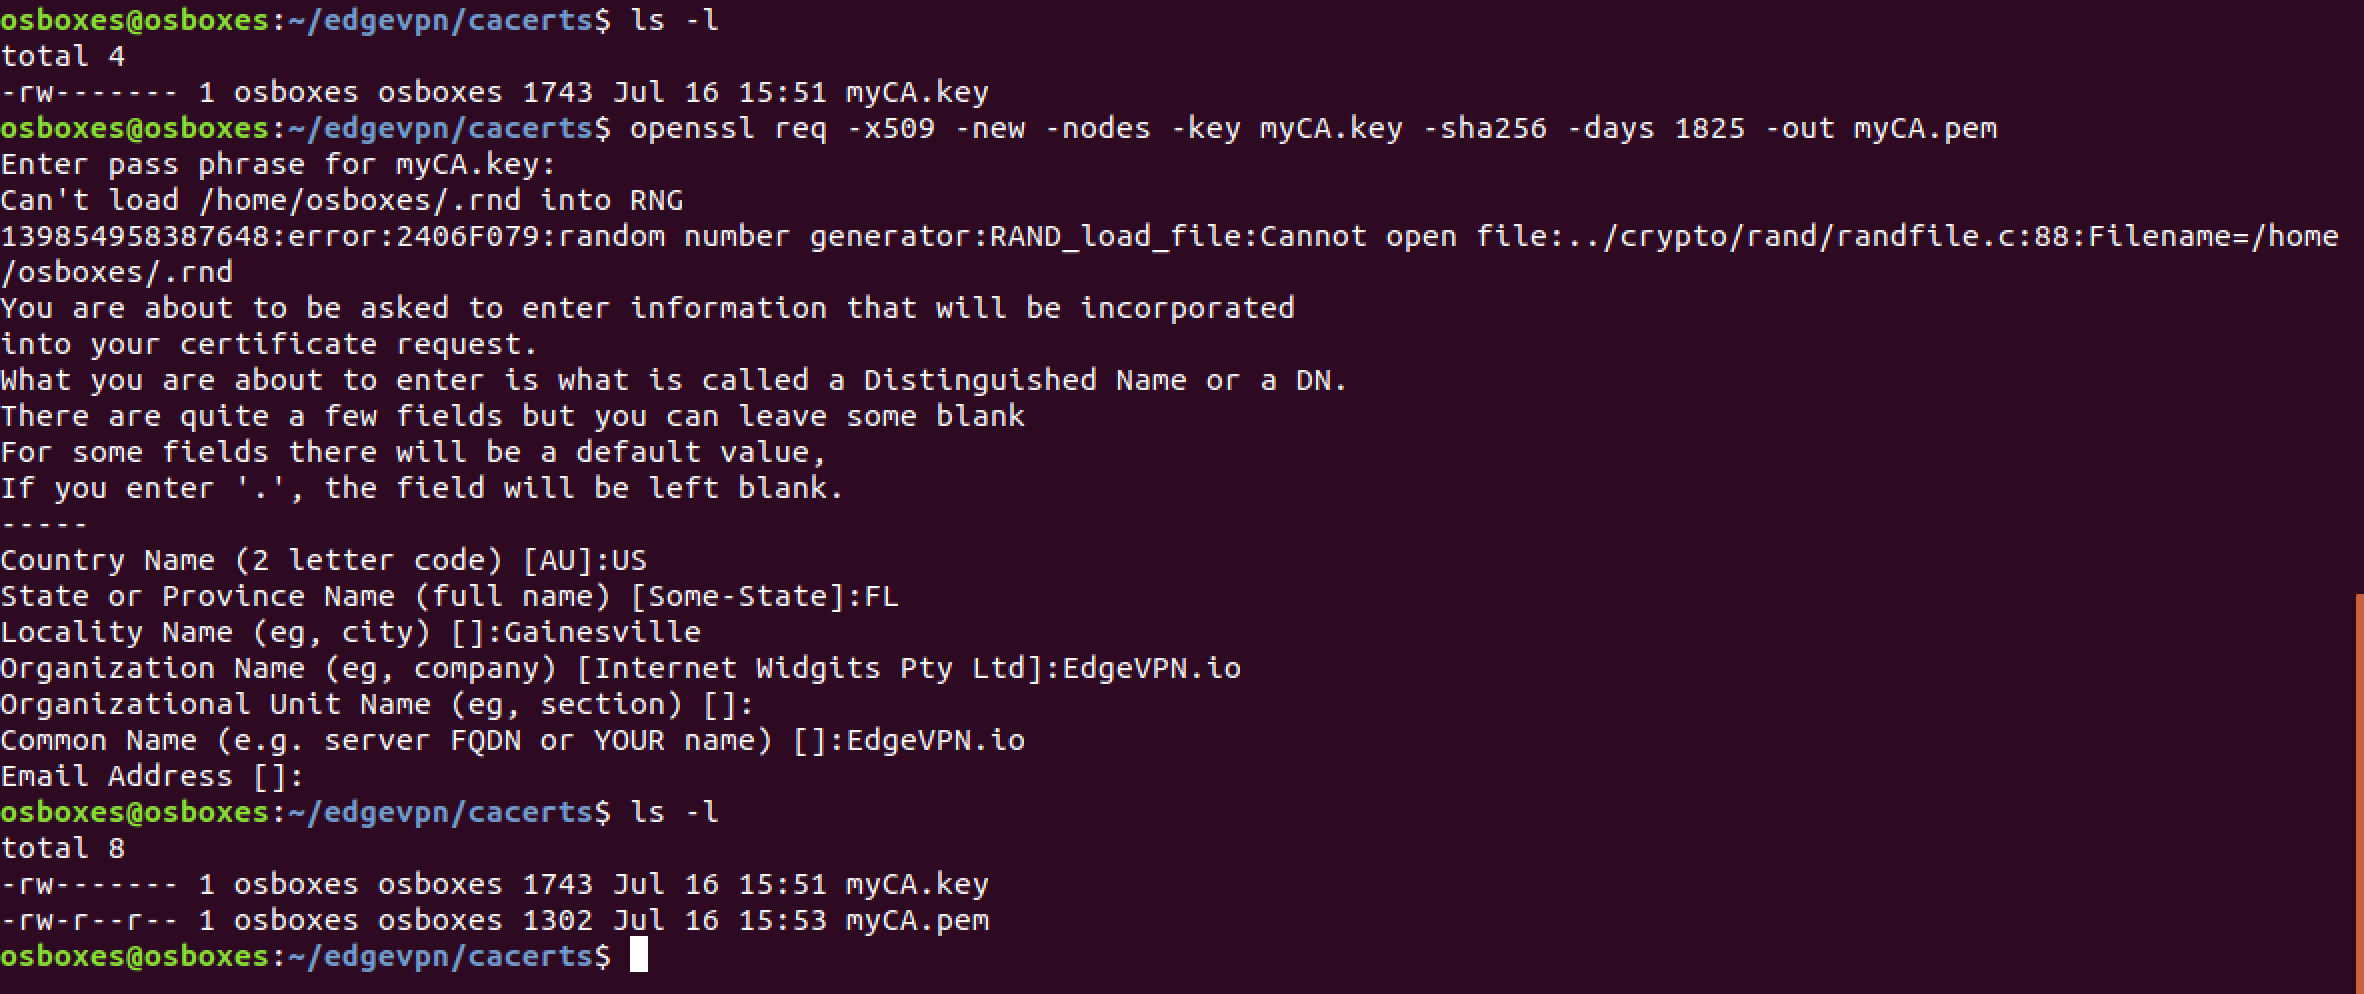
Step 1: Create a directory to hold the certificates and keys:
mkdir cacerts
cd cacerts
Step 2: Create a certificate signing authority and key pair:
openssl genrsa -des3 -out myCA.key 2048
openssl req -x509 -new -nodes -key myCA.key -sha256 -days 1825 -out myCA.pem
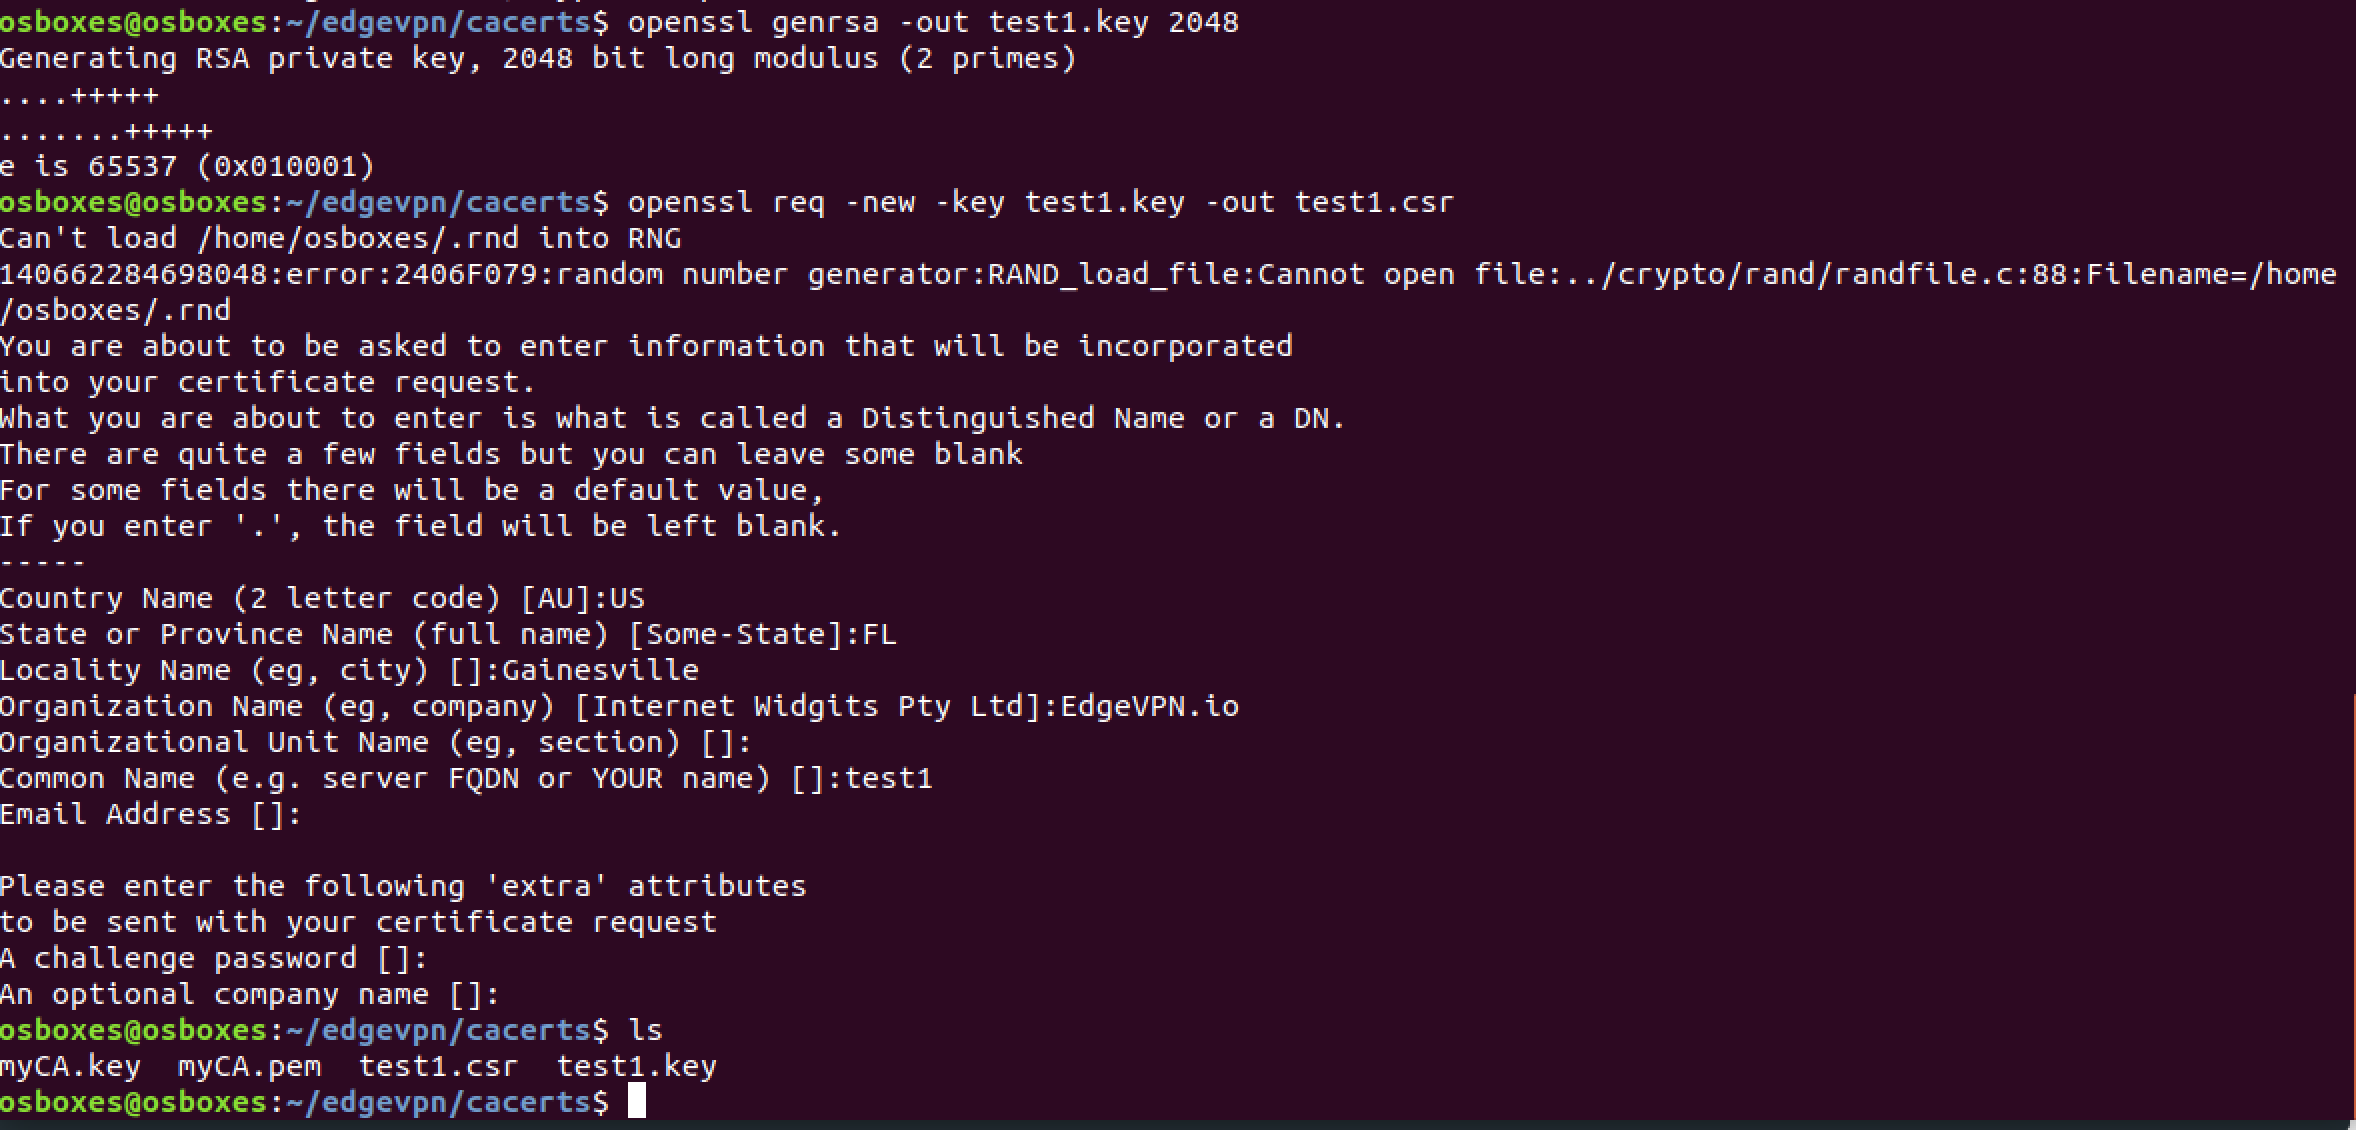
Step 3: Create a private key for the user certificate. In this example, we’ll create a certificate for a user called test1
openssl genrsa -out test1.key 2048
Step 4: Prepare a certificate signing request
Here, the goal is to generate a request to have a certificate for the user signed by the CA.
Note that this command asks for various bits of information (e.g. country, state) to go in the certificate. While most of those fields can be configured arbitrarily, the “Common Name” in the certificate request must match a username on the XMPP server - for instance, test1 in this tutorial. Furthermore the string that goes in the “Common Name” in the certificate must have just the user name part of the full XMPP name@domain string. For instance, whereas you’d use test1@local for user name under password-based authentication (where local is the domain portion), for x509-based authentication the common name in the certificate request is just test1 and does not include @local
This command below generates a certificate signing request (test1.csr) for the CA to sign. Enter the information for the certificate request, as per the screenshot below, and type Enter when asked for a password:
openssl req -new -key test1.key -out test1.csr
Step 5: Sign and create a certificate using the CA credentials
Here, you’ll use the CA’s password to sign the certificate signing request. This will generate the test1.crt certificate file as an output:
openssl x509 -req -in test1.csr -CA myCA.pem -CAkey myCA.key -CAcreateserial -out test1.crt -days 1825 -sha256

Server-side configuration
Once you have a CA and have issued certificates for your users (each node should have its own unique XMPP user name and a certificate generated as explained above), you need to: 1) configure the OpenFire XMPP server to support certificate-based authentication, and 2) upload the CA’s certificate (myCA.pem above) to OpenFire.
Step 1: Your Openfire XMPP server needs to be configured for certificate-based authentication, by ensuring the following properties are set.
You can set properties by navigating (in the admin Web interface) to Server->Server Manager->System properties and manually adding the following properties, one by one, with the following values (clicking the Save Property button each time you do, as per the screenshot below). Note you may want to copy+paste from this tutorial to ensure there are no typos:
Property:                                      Value:
xmpp.client.cert.policy                     -> needed
xmpp.client.certificate.accept-selfsigned   -> true
xmpp.client.certificate.verify              -> true
xmpp.client.certificate.verify.chain        -> true
xmpp.client.certificate.verify.root         -> true
sasl.mechs                                  -> EXTERNAL
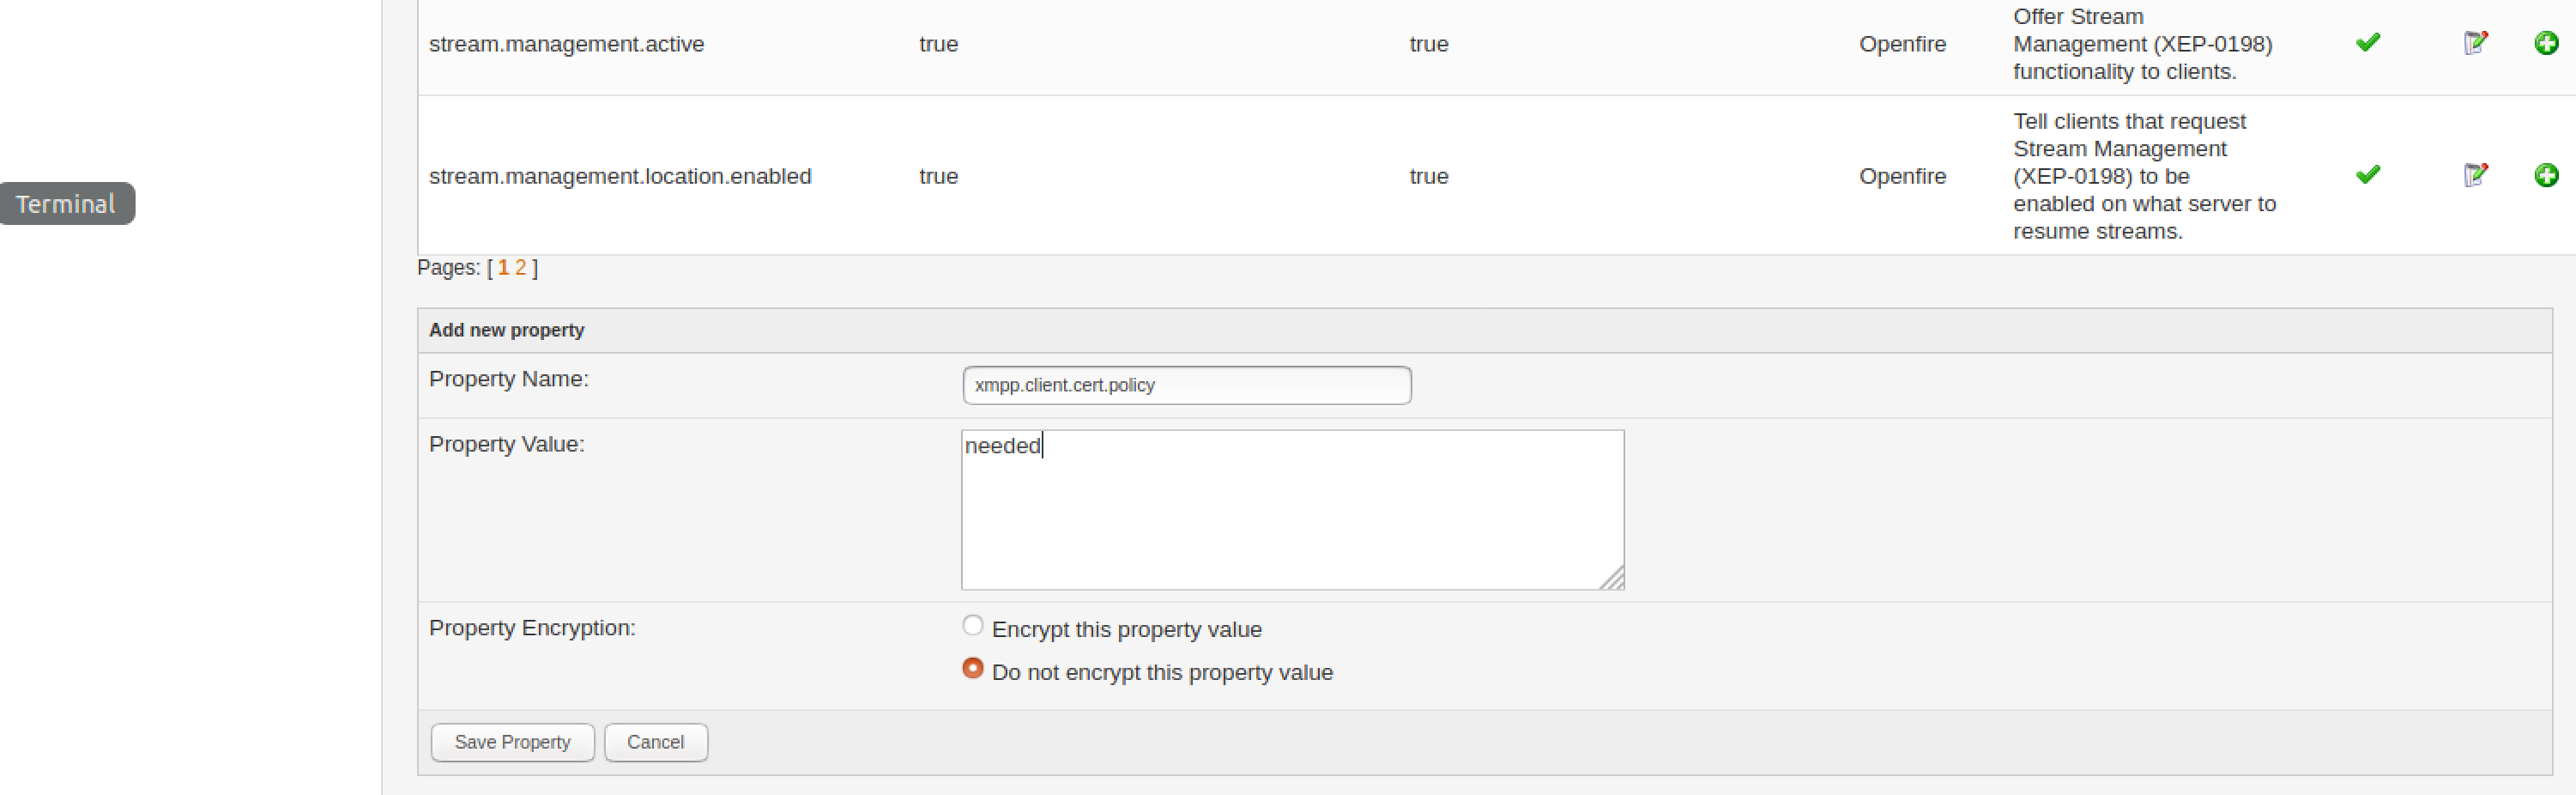
Once you add system properties, double-check that they are correct:


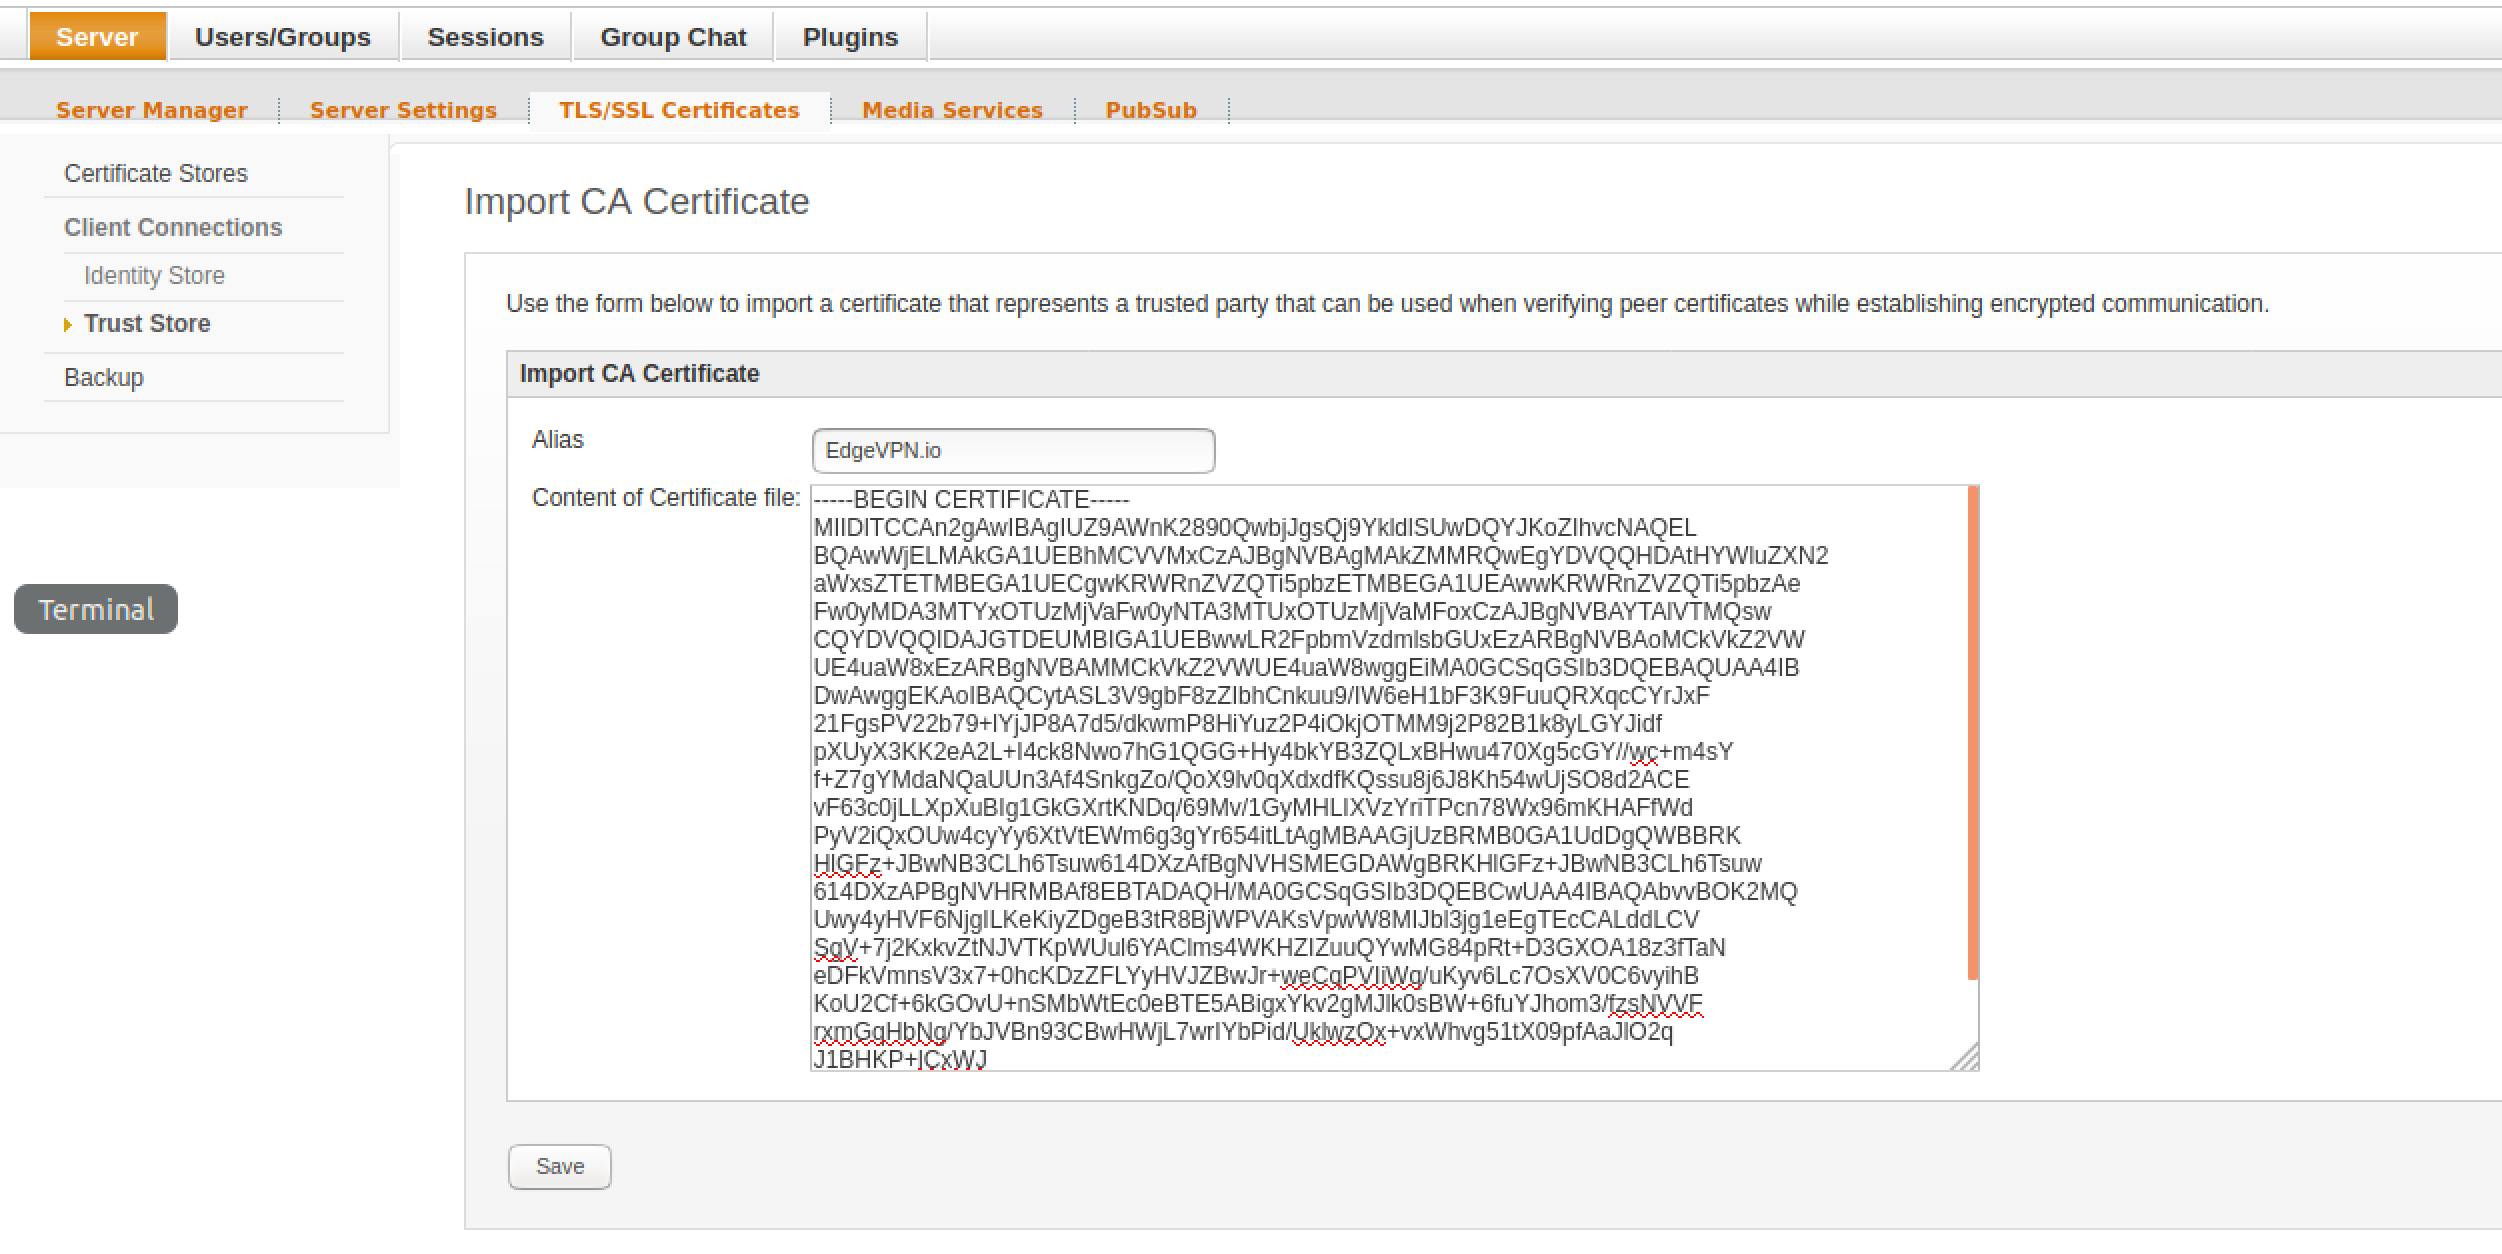
Step 2: Upload CA certificate:
In the Openfire admin Web interface, navigate to Server -> TLS/SSL certificates
In the section Trust store used for connections from clients, navigate to Manage Store Contents

Then, click on import form (it’s an orange text link)
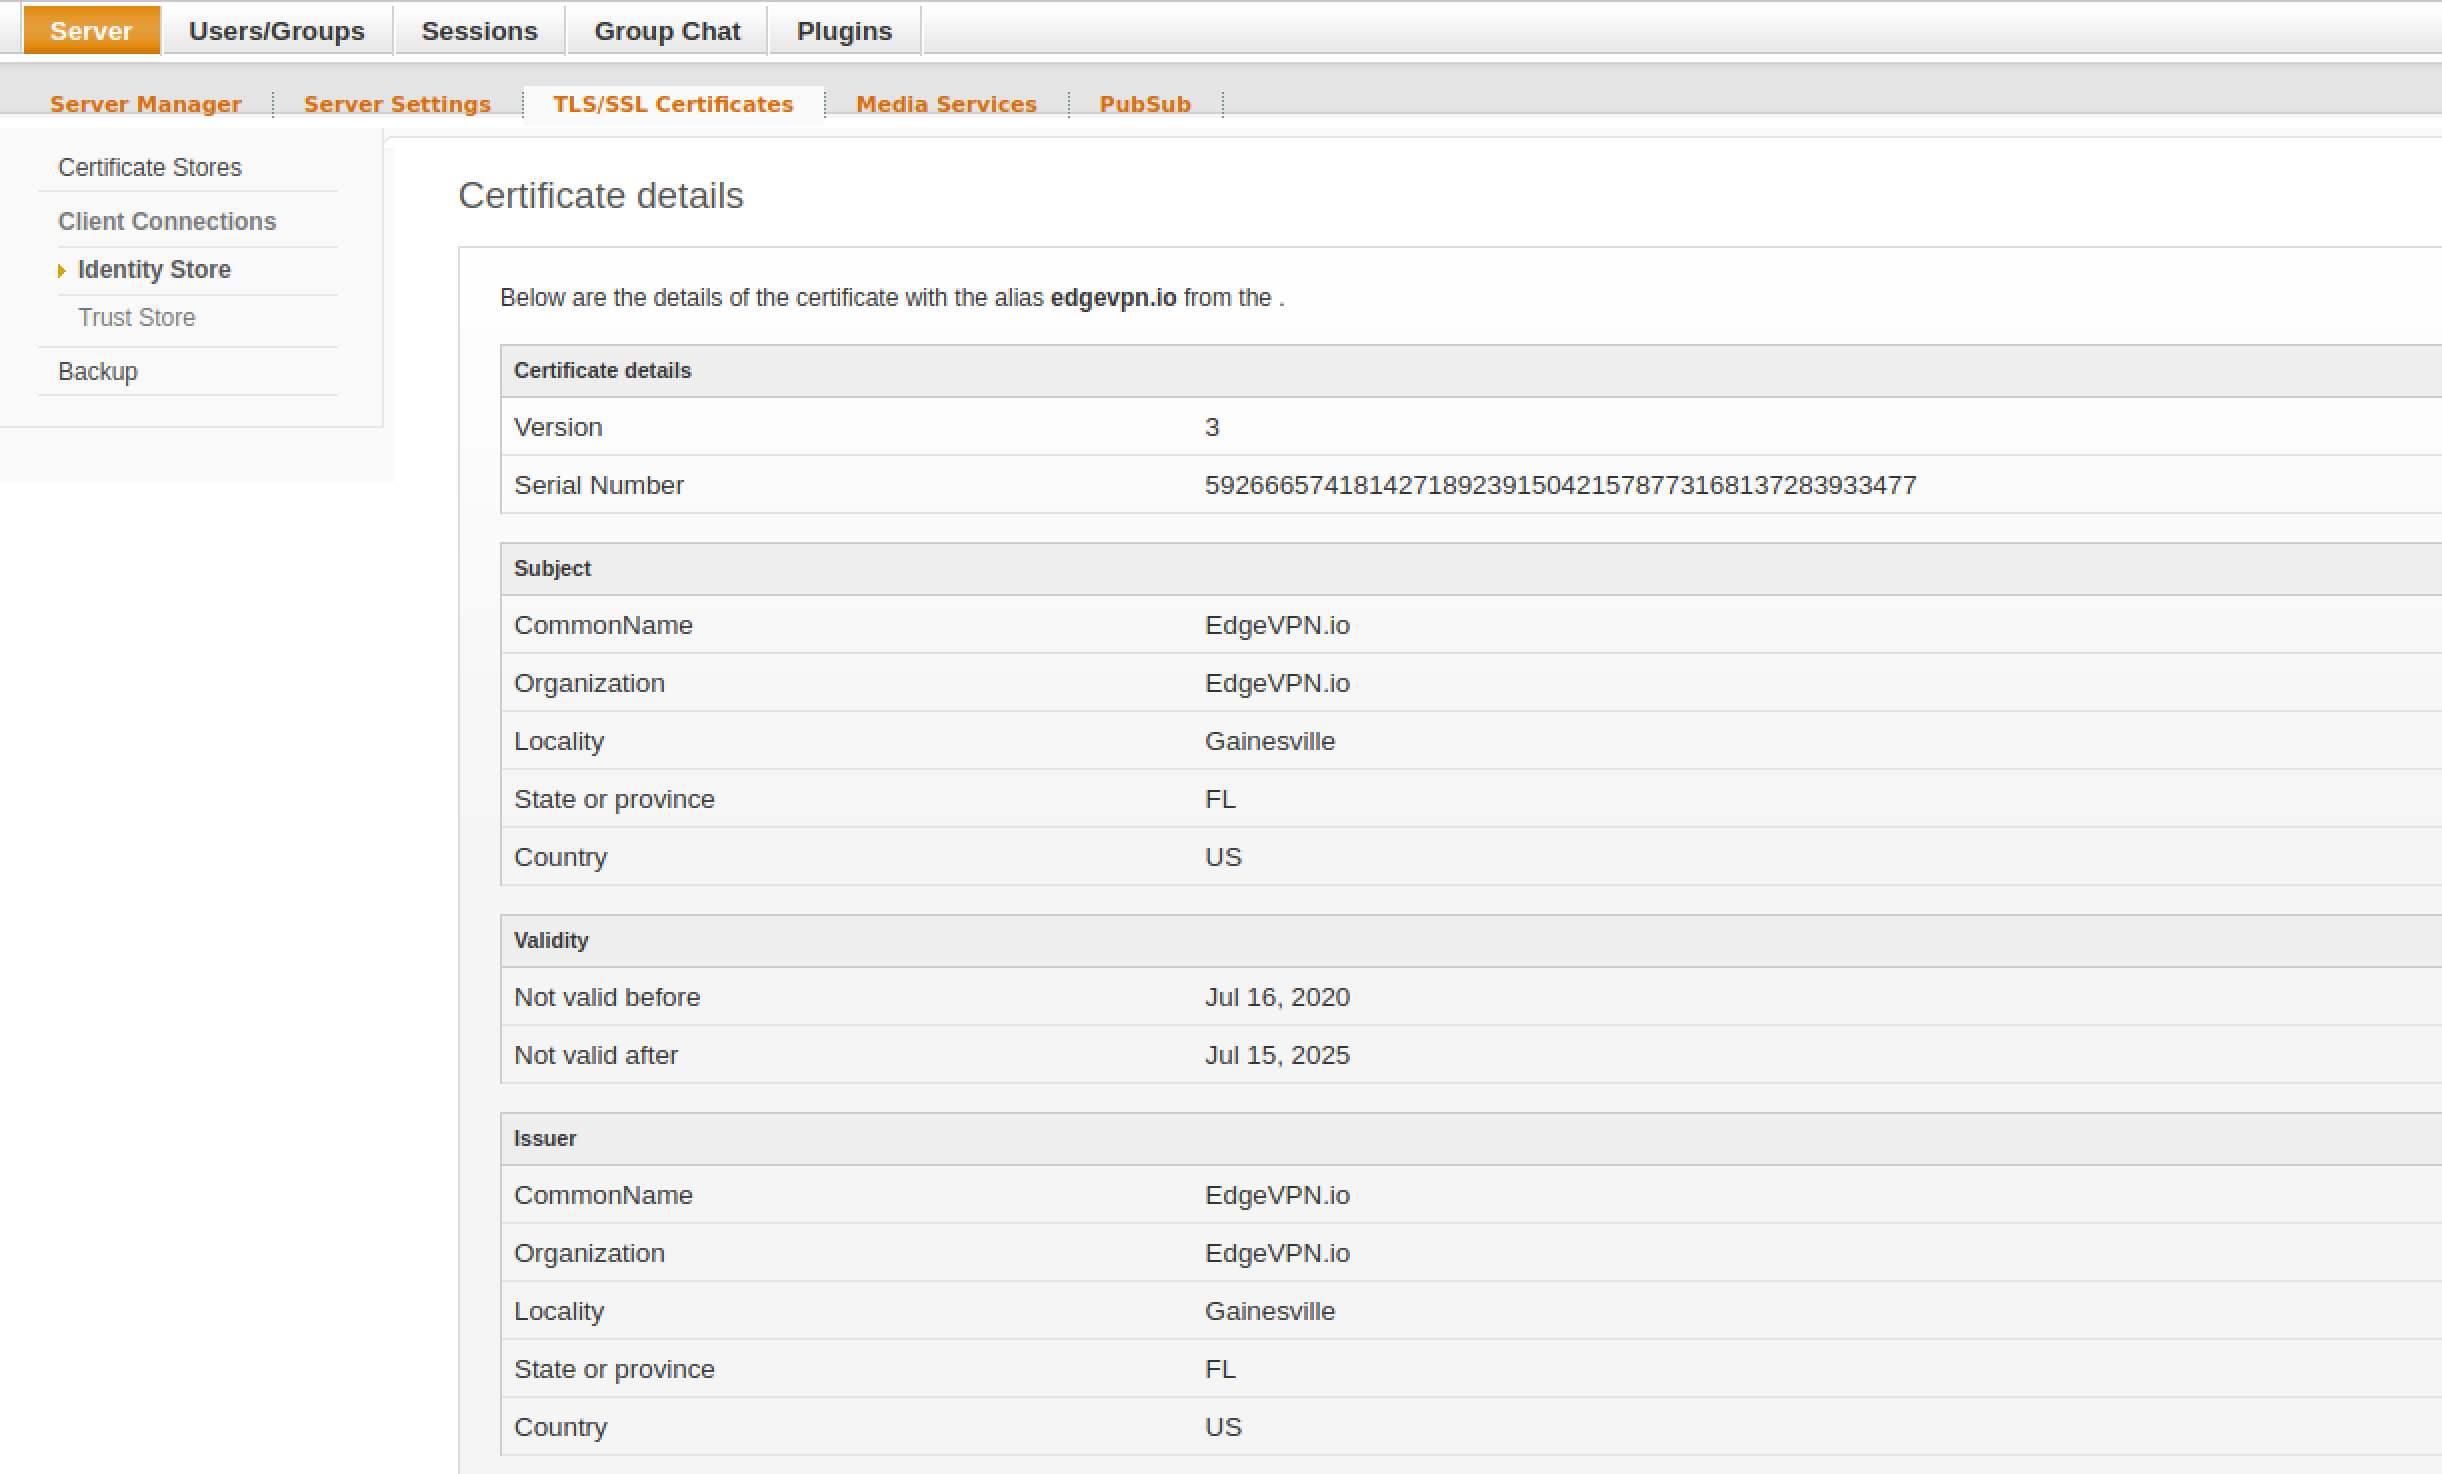
Then, copy and paste the CA’s certificate (the myCA.pem file as described above). Set the CA’s common name (e.g. EdgeVPN.io in this example) as the alias, and click Save:
Once you add the CA, you can verify its contents by clicking on the alias you just added:
Restart the Openfire server
Note: you must restart the Openfire server for the changes above to take effect
This has to be done through a command-line (not the Web interface). If you are using the Openfire Docker container, you can restart it with (replace openfire with the name of your container, and PID with the process ID that runs the Openfire java server):
docker exec -it openfire /bin/bash
# ps -axj|grep java
# kill PID
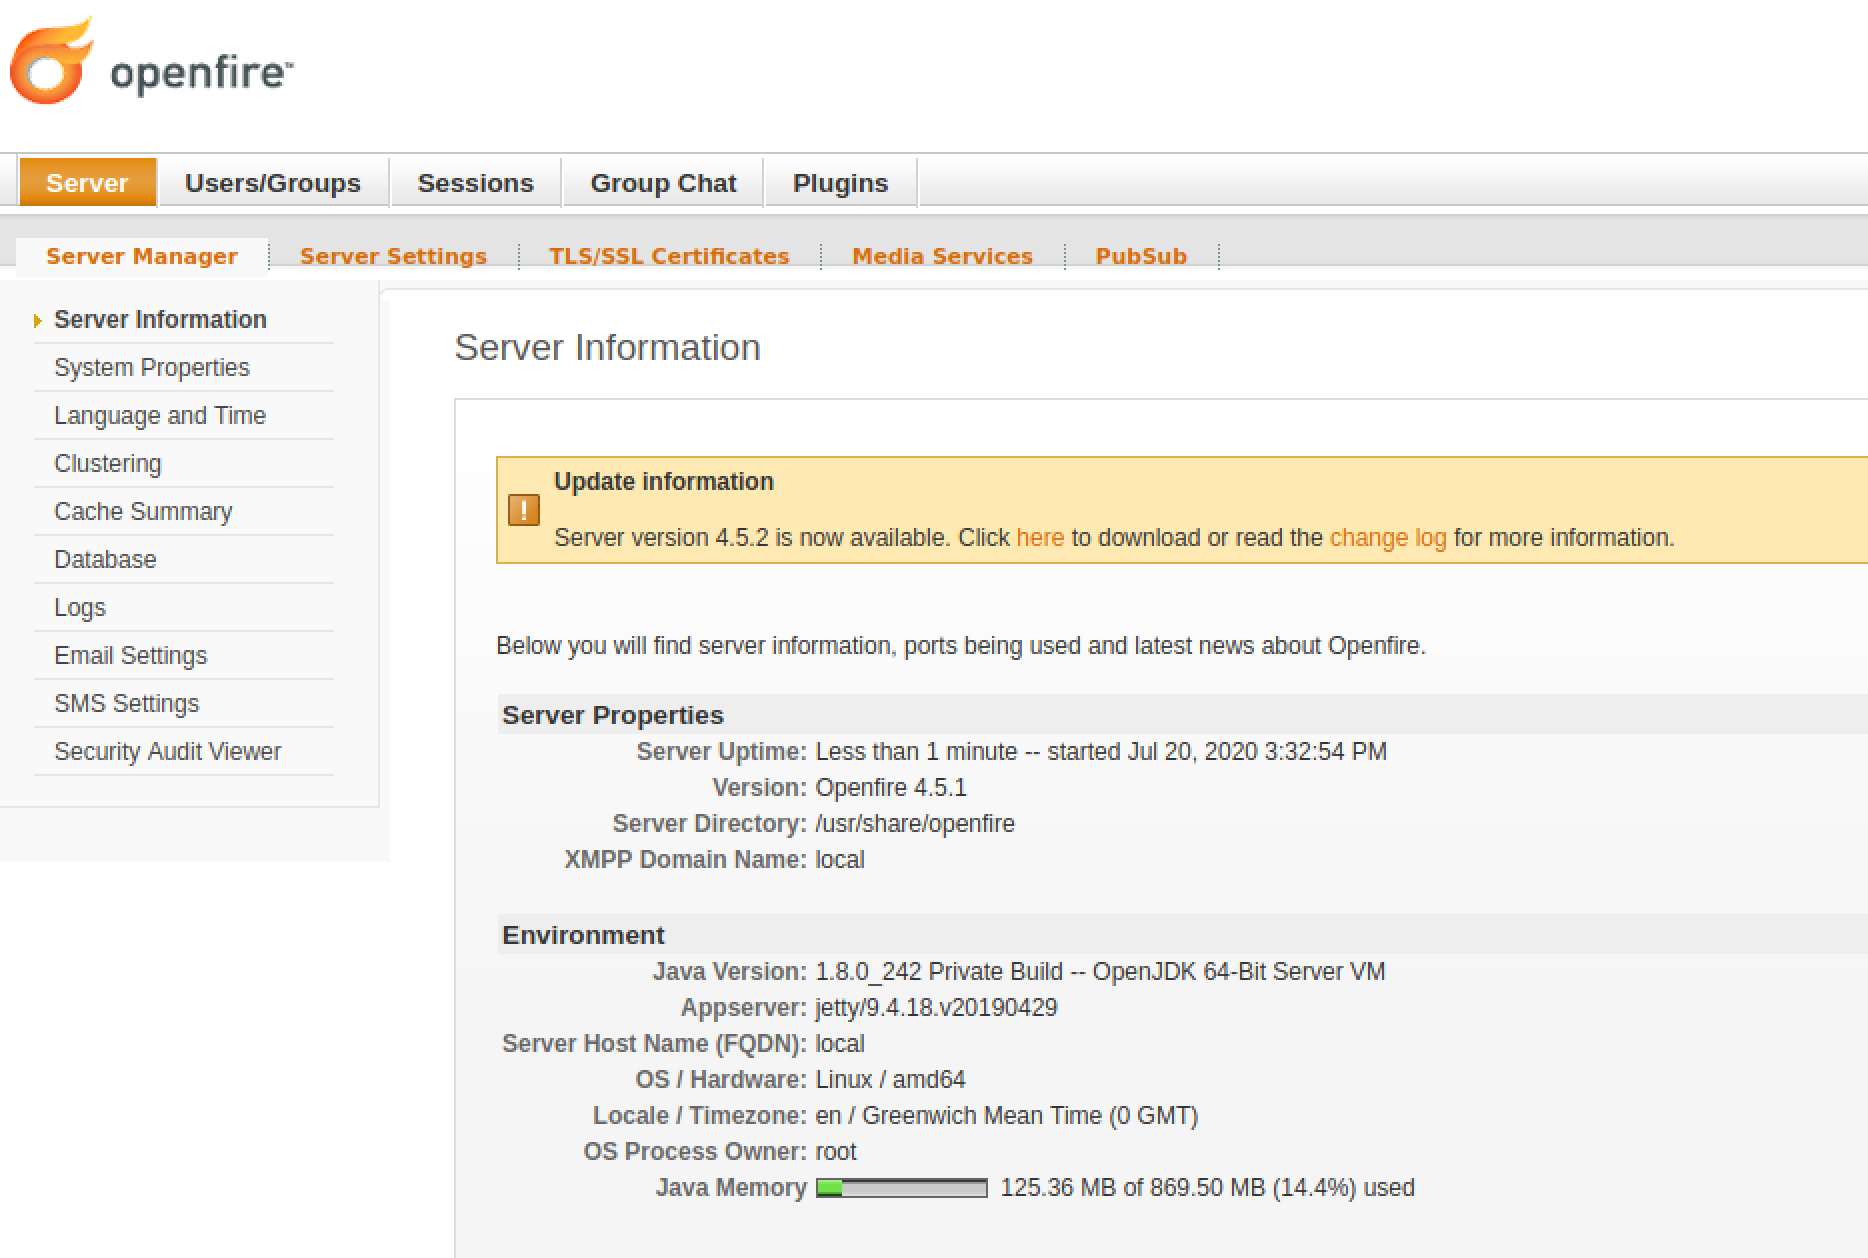
Check that the server restarted by logging back in to the Web admin interface http://A.B.C.D:9090 - the server uptime should reflect it has recently started:
EdgeVPN.io configuration
Each node needs to be configured, in the JSON file, with its certificate and private key. In summary, AuthenticationMethod needs to be set to x509, CertDirectory with the name of a local directory with the user’s certificate and key, CertFile with the file name of the certificate (e.g. test1.crt), and KeyFile with the file name of the private key (e.g. test1.key). Here is a snippet of the relevant part of the configuration:
Note: the Openfire port for x509-based auth is 5223, not 5222
  "Signal": {
    "Enabled": true,
    "Overlays": {
      "1234567": {
        "HostAddress": "A.B.C.D",
        "Port": "5223",
        "AuthenticationMethod": "x509",
        "CertDirectory": "/etc/opt/edge-vpn",
        "CertFile": "test1.crt",
        "KeyFile": "test1.key"
      }
    }
  },
Note: the configuration above assumes the key and certificate are in /etc/opt/edge-vpnio ; if you are running EdgeVPN.io in our distribution Docker container, you need to mount those files as additional volumes, following the pattern in the example below:
docker run -d -v /home/osboxes/edgevpn/config/config-001.json:/etc/opt/edge-vpnio/config.json -v /home/osboxes/edgevpnio/logs/001:/var/log/edge-vpnio/ -v /home/osboxes/edgevpnio/cacerts/test1.key:/etc/opt/edge-vpnio/test1.key -v /home/osboxes/edgevpnio/cacerts/test1.crt:/etc/opt/edge-vpnio/test1.crt --rm --privileged --name edgevpnio001 --network dkrnet edgevpnio/evio-node:20.7 /sbin/init
Please refer to the configuration file documentation for more detailed information.